


Tile guide Marble Shower Tile: read the guide →

![Ivory (Light) Travertine Mosaic - 1x1 Square]()
![Ivory (Light) Travertine 1’’ X 1’’ Mosaic Split-Faced / 1 sheet Wall Tile]()
![Ivory (Light) Travertine Mosaic - 1x1 Square]()
Choose options View details
![Calacatta Gold marble octagon mosaic with Ming-Green dots shown as a complete sheet]()
![Close-up repeating Calacatta Gold marble octagon mosaic pattern with Ming-Green dots]()
![Side-angle detail showing the thickness and stone surfaces of Calacatta Gold octagons and Ming-Green dots]()
Choose options View details
Choose options View details
Choose options View details
 See It in Your Space
ANY 5 SAMPLES: $25 TOTAL. FREE STANDARD SHIPPING.

Choose options View details
Choose options View details
Choose options View details
Choose options View details
Choose options View details
Choose options View details

Choose options View details
Choose options View details
Choose options View details


Compare products
Build a Shower Floor Around Scale and Texture
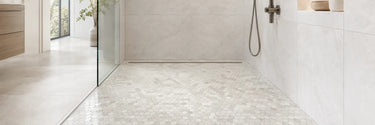
A mosaic shower floor combines natural stone character with the smaller components needed to follow the slope toward the drain. This collection brings together marble, travertine, dolomite, granite, limestone and onyx mosaics in geometric and traditional patterns. Compare color, chip size, surface finish and grout-joint frequency while planning a shower floor that coordinates with the surrounding bathroom.
Natural stone varies in shade, veining, pores and mineral movement. These differences are expected and help create a finished surface that cannot be reproduced exactly from one installation to another. Order samples before selecting the final material, but remember that a sample represents only part of the variation possible within a complete order.
Choose a Mosaic Pattern
Hexagon mosaics create a clean geometric surface and range from compact traditional formats to more prominent designs. Smaller hexagon pieces generally accommodate shower-floor slopes more easily than large components, but the exact layout and drain configuration must still be considered.
Herringbone mosaics introduce directional movement, while basketweave mosaics provide a classic woven appearance. For a quieter grid, explore square mosaics. Penny-round mosaics add curved detail and frequent grout joints that make the pattern especially visible across the shower floor.
Octagon, pinwheel, diamond and other decorative arrangements can connect the shower floor with a traditional or highly detailed bathroom design. Pattern complexity affects cuts, drain placement and installation time, so review the sheet dimensions and discuss the proposed layout with the installer before ordering.
Compare Marble, Travertine and Other Stones
Marble mosaics range from bright white and softly veined stone to black, green, beige and dramatic multicolor varieties. Their appearance can change considerably between polished, honed and textured finishes.
Travertine mosaics offer warmer ivory, walnut, silver and mixed earth tones with naturally occurring pores and movement. Tumbled travertine can be used for appropriate shower-floor installations and creates a softer, aged surface, but the exact product, filling, sealing and maintenance requirements should be confirmed before installation.
Dolomite, granite, limestone and onyx provide additional color and pattern choices. Stone type alone does not determine shower-floor suitability. Chip dimensions, finish, fabrication, substrate, drainage and the installer’s assessment must be considered together.
Understand Finish and Grout-Joint Frequency
Polished stone emphasizes color and reflectivity, honed stone creates a lower-sheen appearance, and brushed or tumbled finishes add texture. No finish should be selected for a wet floor based on appearance alone. Slip characteristics can vary by product, surface treatment, maintenance and installation conditions.
Mosaic sheets contain more grout joints than larger field tiles. Those joints define the pattern and can provide additional surface interruption, but grout does not replace proper product selection. Grout color also changes the visual result: a closely matched color creates a quieter surface, while contrasting grout emphasizes each individual piece.
Plan the Slope, Drain and Layout
A shower floor must be properly sloped toward the drain without creating low areas where water can collect. Smaller mosaic components generally conform to the slope more readily, while elongated or irregular patterns require careful sheet placement and cutting. Drain shape and position should be coordinated with the pattern before installation begins.
Dry-lay several sheets to check alignment, sheet transitions and color distribution. Blend material from multiple boxes so natural variation appears balanced throughout the floor. The installer should also verify the substrate, waterproofing system, setting material, grout and movement-joint requirements.
Coordinate the Complete Shower
The shower floor can contrast with the wall tile or repeat the same stone in a smaller format. Browse natural stone shower tile for coordinating wall and niche options, or compare the broader bathroom tile collection when planning the surrounding floor, vanity wall or backsplash.
Before purchasing, review the individual product’s recommended applications and have a qualified installer confirm that the chosen stone, finish and mosaic format are appropriate for the specific shower. Installation requirements and ongoing care can differ by material.
Sealing and Routine Care
Many natural stone mosaics benefit from sealing, although the appropriate product and schedule depend on the stone, finish, grout and installation. Some materials may require sealing before grouting and periodic resealing afterward. Sealer does not replace the waterproofing system beneath the tile.
Clean the finished shower floor with a stone-safe, pH-neutral product and remove soap residue before it accumulates. Avoid acidic or abrasive cleaners unless their compatibility with the selected stone has been confirmed. Proper installation and routine maintenance help preserve the surface while allowing its natural variation to remain visible.
Explore more: Hexagon Mosaic Tile · Marble Penny Tile · Natural Stone Shower Tile · Shower Wall Tile